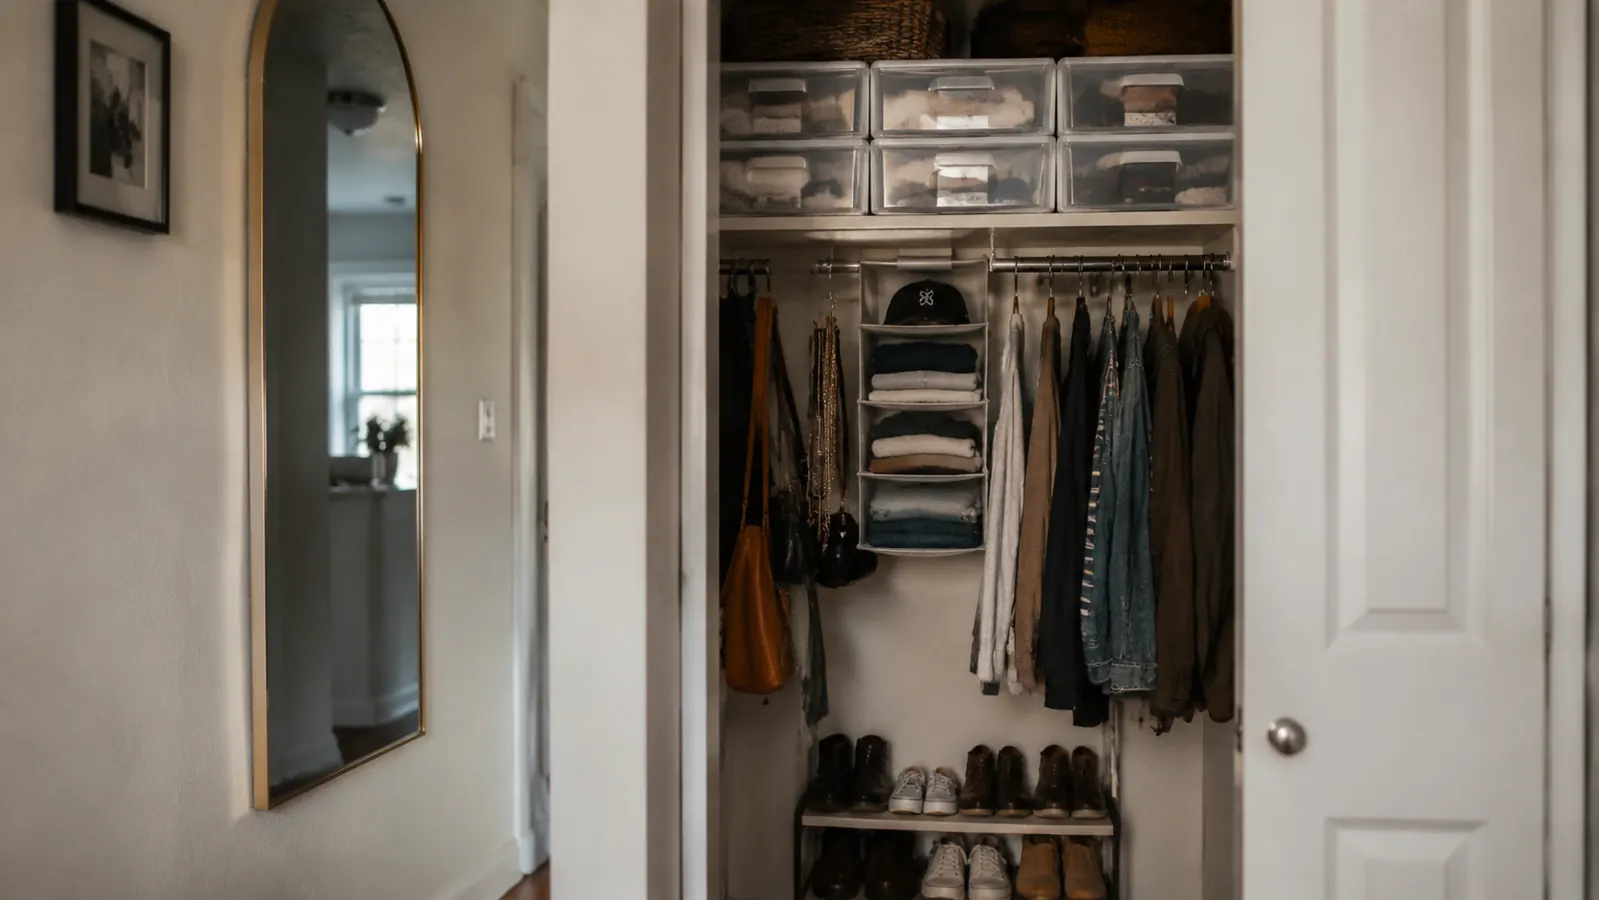
My first rental apartment had one closet. Not a walk-in, not a reach-in with double rods. One 30-inch-wide single-rod closet that had to hold everything. Coats, extra bedding, off-season shoes, cleaning supplies, a vacuum that barely fit diagonally. I shoved things in until the door would barely close, then spent five minutes digging every time I needed something from the back. That is a problem most renters know well, and it has a straightforward fix that does not require a single nail hole.
Stackable storage bins are the most underrated tool for small-closet organization. They use vertical space, keep categories separate, stay visible through clear walls, and move out clean when you do. The Sterilite 6-Pack Clip Box with latching lids has been my go-to for about two years across three different apartments. Stack them two or three high on the closet floor, clip the lids, and a chaotic pile becomes a tidy grid you can actually navigate. This guide walks through exactly how I set up a small rental closet using that system, from measuring to final arrangement, with no tools beyond a tape measure.
Stop losing things in your closet every morning
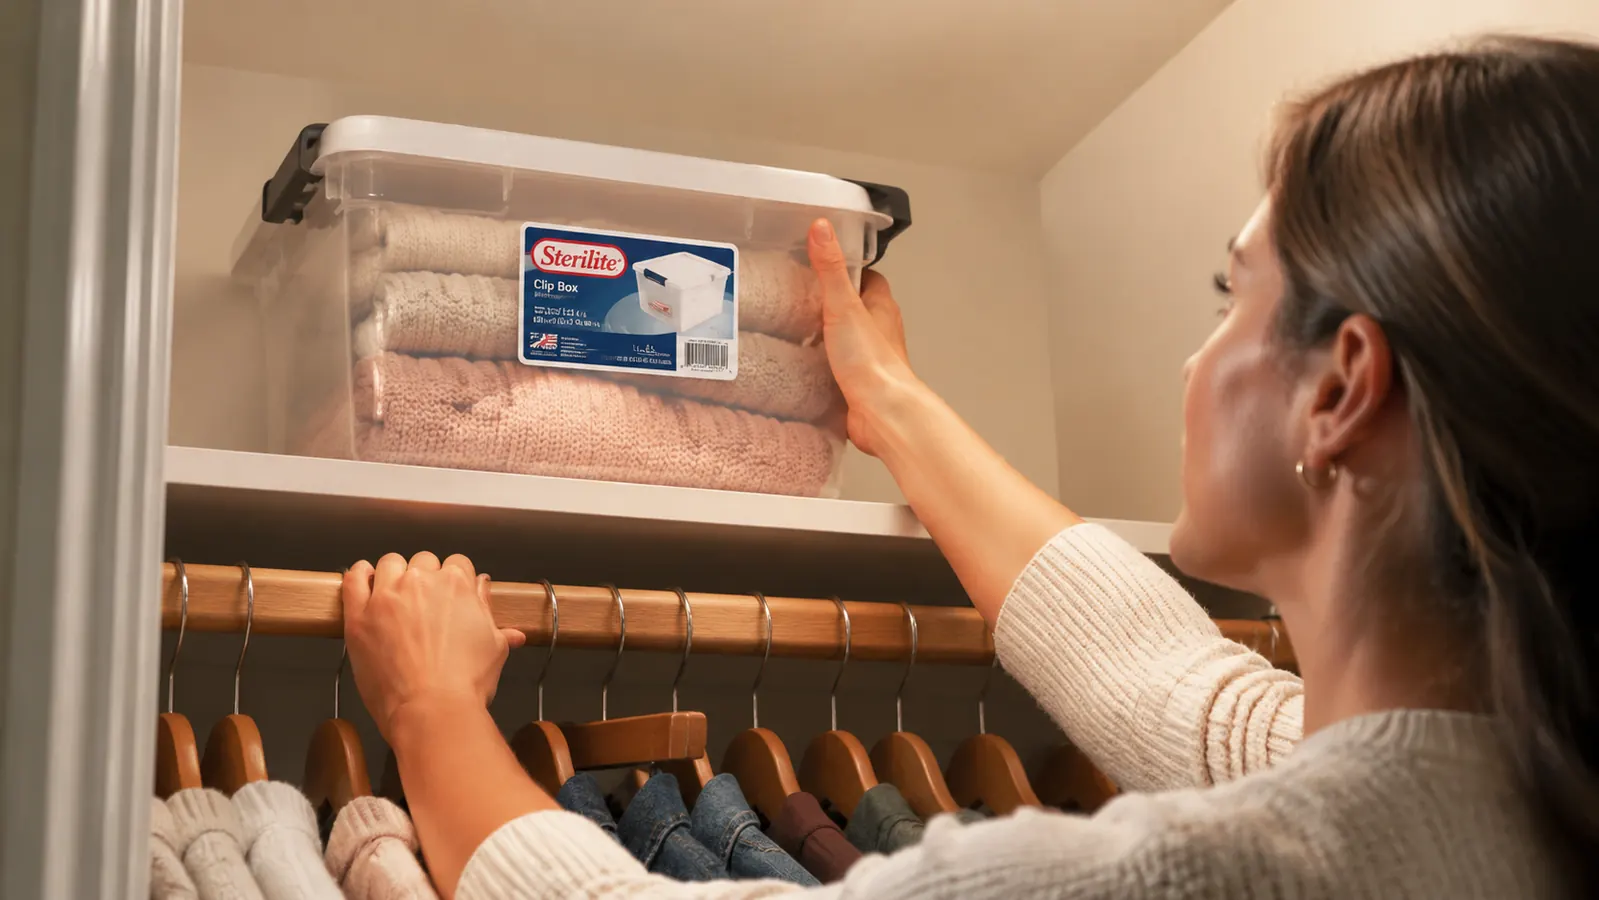
The Sterilite 6-Pack Clip Box is the stackable clear bin most renters reach for first. Latching lids, fully clear walls, and a footprint that fits standard closet floors without any modifications.
Amazon Check Today's Price on Amazon →Step 1: Empty the Closet Completely and Measure the Floor
Do not skip the emptying. I know it feels like more work up front, but reorganizing around existing clutter just means you rebuild the same pile with fancier containers. Pull everything out onto the bed or the floor of the adjacent room. Set aside anything you are keeping, create a donate pile, and throw away the things you have been meaning to deal with for six months. You know the ones.
Once the closet is empty, measure the interior floor width, the depth from the back wall to where the door frame starts, and the clearance from the floor to the lowest hanging clothes. Write those numbers down. The Sterilite Large Clip Box measures roughly 18 inches long by 12 inches wide by 7.5 inches tall. A 36-inch-wide closet fits two bins side by side with a couple of inches to spare. A 24-inch closet fits one column comfortably. Knowing your exact floor space before you buy anything prevents the frustrating discovery that your bins technically fit but the lid cannot fully open.
Also measure the height from the floor to the underside of any fixed shelf above. In most apartment closets this is between 60 and 72 inches. Two Sterilite Large Clip Boxes stacked will reach about 15 inches, leaving plenty of headroom for a third stack or for free-standing taller items like a vacuum. Three stacks high hits about 22.5 inches, still well under most fixed shelves and stable enough with the latching clips keeping each lid locked to the bin above.
Step 2: Sort Everything Into Categories Before a Single Bin Gets Placed
The sorting step is where most closet projects fail. People grab a bin, fill it with whatever is nearby, label it 'misc,' and wonder why the closet is a mess again in two weeks. Categories need to be specific enough to be useful and broad enough that you are not maintaining thirty bins. For a typical one-bedroom rental closet I sort into five to seven buckets: seasonal clothes, bedding and spare towels, shoes, cleaning supplies, tools and hardware, hobby gear, and one bin for things that genuinely have nowhere else to go.
Seasonal clothes are the biggest candidate for bin storage. Winter sweaters in May take up prime closet rod real estate. Fold them flat, stack them in a bin, clip the lid, and put that bin on the bottom of a stack. You will not touch it for six months. Same logic applies to spare bedding sets: one flat sheet set folded tightly fits in a single large bin with room for a pillowcase on top. Shoes are a judgment call. I prefer a separate shoe rack for current-season footwear and use one bin for off-season or backup pairs. Cleaning supplies belong in a bin with a lid if you have any products that can leak.
Lay the sorted piles out on the bed or floor before you start loading bins. This gives you a visual count so you can estimate how many bins each category needs before you commit. Overestimating by one bin is fine. Underestimating means a second Amazon order and a week of living with an unfinished system.
Step 3: Load the Bins, Prioritizing Access Frequency
A bin you reach into every week should never go on the bottom of a stack. That sounds obvious but most people load bins in whatever order the pile on the bed happens to be in, then curse every time they need the thing buried underneath two other bins. Before you load anything, decide: daily or weekly use, monthly use, or seasonal or rare use. That hierarchy determines your stack order from top to bottom.
Weekly-use bins go on top of each stack or on the most accessible upper shelf. Monthly-use bins go in the middle. Seasonal bins go on the bottom. For me that means the bin with spare charging cables and batteries lives at waist height. The bin with three sets of extra bedding lives on the floor with a seasonal bin stacked on top of it. The Christmas decoration bin goes on the high shelf and does not get touched until December. If you have a high fixed shelf in the closet, that is prime real estate for the once-a-year stuff: tax documents, sentimental items, holiday decorations.
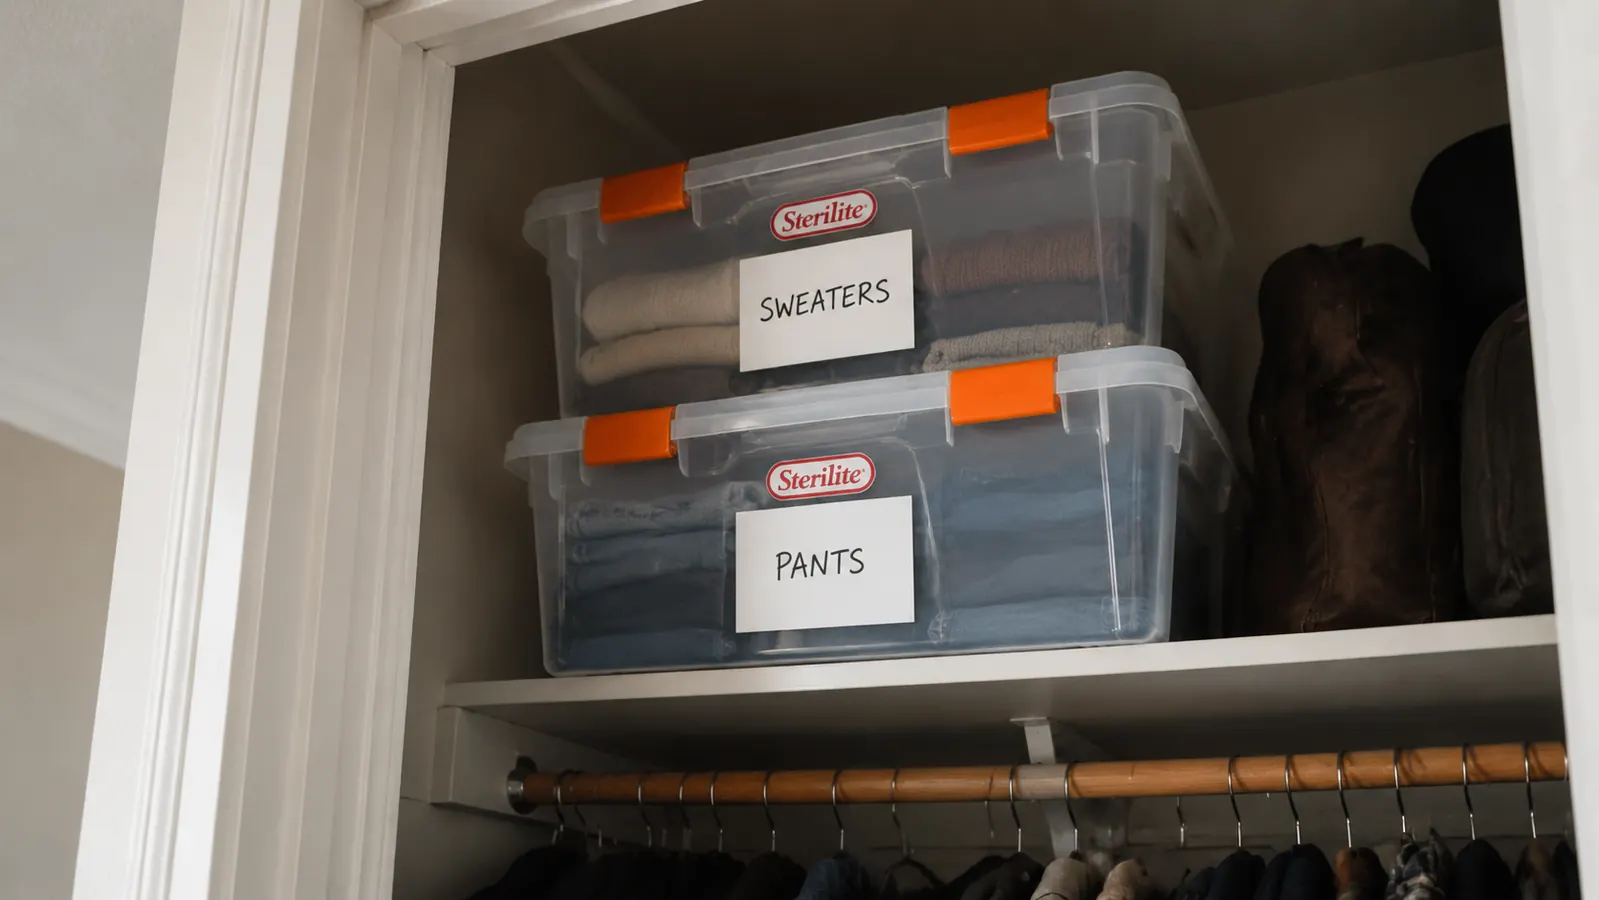
The Sterilite Clip Boxes are clear enough that you can identify contents at a glance without unstacking, but I still recommend keeping similar categories in the same column. All bedding in the left column, all seasonal clothes in the right column. When you need to dig, you know exactly which stack to go to without reading every label.
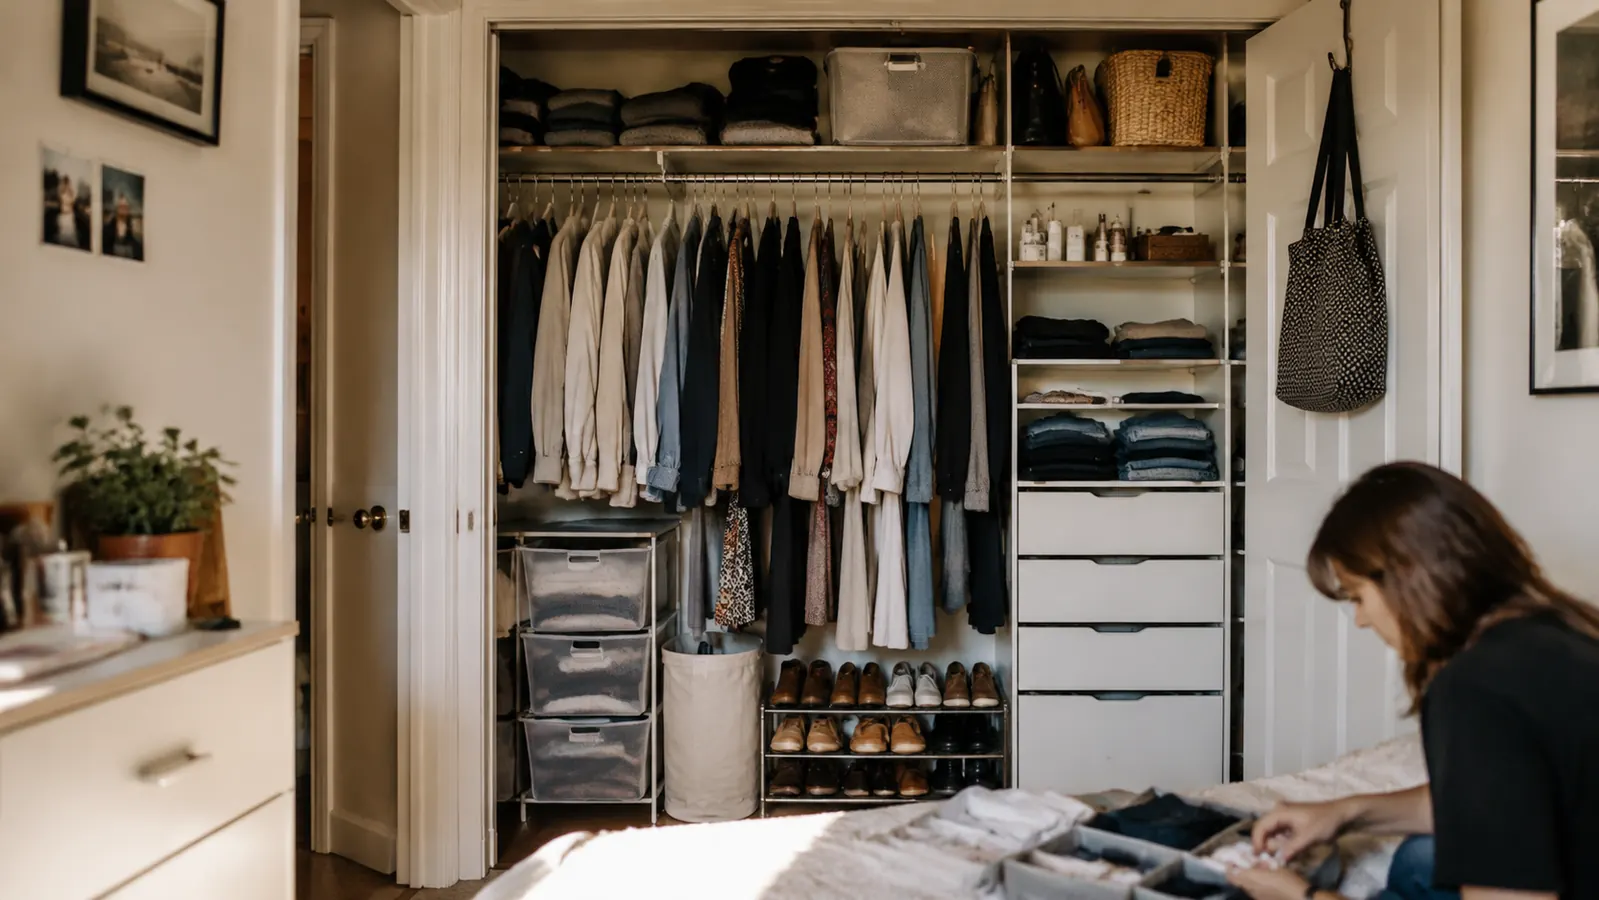
Step 4: Stack Deliberately and Use the Vertical Space Above the Bins
Standard rental closets have more vertical space than people use. The floor-to-ceiling height in most apartments is 8 feet. A typical closet rod sits at about 66 inches. That leaves 30 inches of dead space above the rod and a fixed shelf that usually sits around 72 to 78 inches. Most people throw one flat layer of junk on that shelf and call it done. That single shelf is genuinely useful but only if what is up there is intentional and accessible.
On the floor, place your bin columns first with the heaviest categories on the bottom. The latching clips on the Sterilite Clip Boxes are not just for keeping lids shut during transport; they create a stable connection between stacked bins that prevents the top bin from sliding sideways when you grab something. In practice a two-bin stack is rock solid. Three bins high is fine on a flat floor. I would not go four high for anything you need to access regularly, not because of instability but because reaching overhead to undo a clip and lift a bin gets old fast.
Use the wall space on either side of the bin columns for tall items that do not stack well: vacuum cleaners, garment bags, a folded drying rack, an ironing board. A slim shoe rack can sit in a 12-inch gap at the end of the bin columns if your closet width allows it. The goal is to treat every vertical inch as intentional real estate rather than a place for things to lean and fall over each time the door opens.
Step 5: Label Every Bin and Do a One-Week Stress Test
Labels are not optional if you want the system to last. Without them you rely on memory to know which bin holds the spare towels versus the extra bedding, and memory degrades fast when you are in a hurry. A simple label on the front face of each bin takes three minutes and saves a disproportionate amount of time over the next two years. I use a handheld label maker for clean printed labels, but a strip of masking tape with a black marker works just as well if that is what you have.
After the system is set up, live with it for one week before declaring it done. A week of real use tells you more than any planning session. Pay attention to which bins you access more than you predicted and which ones you reach around awkwardly. If a bin is in the wrong position, now is the time to swap it before the habit sets. Small adjustments during the first week are normal and not a sign the system failed. The bins are easy to restack and relabel. Commit to the system for a month and most people find the closet stays organized with almost no maintenance because everything has a specific place.
One practical note: snap a photo of your organized closet before you move out. In my experience landlords sometimes question whether the closet looked this way when you arrived. A timestamp photo protects you and gives you a reference for setting up the same system in your next place.
What Else Helps
Stackable bins solve the floor and low-shelf problem but a small closet usually has a few gaps worth addressing with additional tools. A second hanging rod suspended below the main rod with an adjustable S-hook doubles your hanging capacity for shorter items like folded shirts and jackets without a single hole in the wall. Over-the-door organizers add storage for shoes, bags, and small accessories in a footprint that does not eat into the floor. If the closet is too small to hold all of your hanging clothes, a freestanding portable closet in the bedroom corner picks up the overflow without any construction; a well-reviewed option on Amazon can handle a full hanging wardrobe in a corner of about 20 square feet. See our review of the Neprock portable closet for a detailed look at that option. For the bins themselves, if you want a deeper comparison of stackable clear bins before buying, our Sterilite Clip Box review covers 18 months of real-world use including what holds up and what does not.
A two-bin stack is rock solid. Three bins high is fine on a flat floor. What actually breaks systems is access order, not stability. Put your most-used bins on top and the system runs itself.
Your closet floor is wasted space until you stack it
The Sterilite 6-Pack Clip Box is one of the most practical floor-space solutions for rental closets. Clear walls, secure latching lids, and a size that stacks three high with room to spare under a standard shelf. Current pricing is on Amazon.
Amazon Check Today's Price on Amazon →